Of the various virtual reality headsets that have emerged this year, HTC Vive is the one that's most delivered on the lofty promises of VR. It's designed to put your entire body into a digital realm. Once you find some good sources of VR videos, or have regular 3D movies like Avatar, Guardians of the Galaxy, Zootopia, Captain America: Civil War, X-Men: Apocalypse, Star Trek Beyond, Ice Age: Collision Course, or stuff like that, you can start watching these 3D movies on HTC Vive and putting yourself into a virtual world.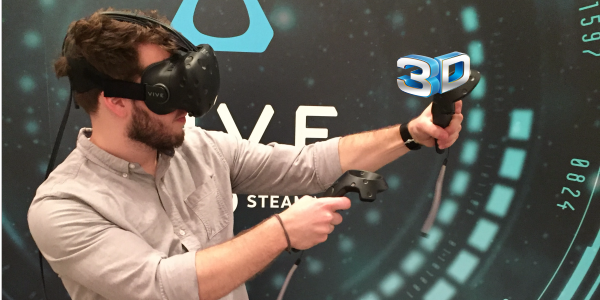 Full HTC Vive 3D Movie HOWTO GuidePreparation:1. Best HTC Vive Video Converter- Watch 3D videos on HTC ViveWatching VR video on HTC Vive is a good taster of Virtual Reality within budget. Can any 3D video be viewed on HTC Vive? No. But with HTC Vive Video Converter -Dimo Video Converter Ultimate, you can watch any 3D movies on HTC Vive without error.With it, you are able convert unsupported 3D movies including 3D Blu-ray to SBS 3D MP4 files for playback on your HTC Vive in just few clicks. It has the most amazingly easy to operate interface. Even freshers, who have no information on how to convert 3D movies, can quickly finish the 3D video conversion by following the guide. It supports not only HTC Vive, but also all VR headsets like Gear VR, VR One, Rift DK2, Google Cardboard, etc. and mainstream 3D TV, 3D media players! By the way, thanks to its advanced NVIDIA CUDA technology, you'll going to process your conversion at 6X faster speed while retaining excellent output quality.If you are a Mac user, you can turn to Dimo Video Converter Ultimate for Mac (OS Sierra, El Capitan included), which has the same function as the Windows version.Free Download Dimo Video Converter Ultimate (Win/Mac):
 Other Download:
2. Buy/Download a 3D movie that is in these formats:.mp4 .m4v .3gp .3g2 .ts .webm .mkv .wmv .asf .avi .flv. In my opinion, .mp4 is best, while audio is aac.3. A VR player appa. Whirligig To watch a video, click the Browse button in the top left-hand corner of the menu. You'll be able to browse your hard drive to choose a video file. (Whirligig also claims to support YouTube links in its Settings, but I couldn't get that to work at the time of this writing.)
Other Download:
2. Buy/Download a 3D movie that is in these formats:.mp4 .m4v .3gp .3g2 .ts .webm .mkv .wmv .asf .avi .flv. In my opinion, .mp4 is best, while audio is aac.3. A VR player appa. Whirligig To watch a video, click the Browse button in the top left-hand corner of the menu. You'll be able to browse your hard drive to choose a video file. (Whirligig also claims to support YouTube links in its Settings, but I couldn't get that to work at the time of this writing.) As the video starts to play, you'll probably want to adjust some settings using Whirligig's heads-up controls. Here's what we recommend for each type of video:
- Regular 2D video: Set Projector to Cinema or Cinema Curved.
- 3D video: 3D video comes in a few different forms, so check the video you downloaded–or the settings you used when you ripped it–to see whether it's Half Side-By-Side, Full Side-By-Side, Half Over-Under, or Full Over-Under. Set the Projector to either Cinema or Cinema Curved, then select SBS or OU instead of Mono. If the video is Half SBS, set Stretch to "100" so it displays in the proper aspect ratio.
- 180 or 360 degree video: The video will usually tell you whether it's 180 degrees or 360 degrees on the site you download it from. If it's 180 degrees, set Projector to "Fisheye" and set FOV to 180. If it's 360, set Projector to "Barrel" and FOV to 360. You may also have to tweak "Tilt" for 180 videos or "Rotation" for 360 videos so that the video is facing the right direction.
- Full VR video: Combine the correct settings from "3D video" and "180 or 360 degree video" sections of this list. You can also adjust the Scale and Distance settings to fit your tastes, or click the Settings cog in the lower right-hand corner for even more options. Whirligig also has some other cool features like saving different presets, but these basics should get you up and running pretty quickly. For now, sit back and enjoy the movie!
b. Virtual DesktopWhirligig isn't the only way to watch videos on your VR headset, but it was the best cost-to-performance ratio in our tests. If you're willing to pay a little more, Virtual Desktop ($15) is also pretty good, and can do a lot more than play videos–it is, as the name implies, a full version of your PC's desktop in virtual reality. Just play a video in your favorite desktop player (like VLC), set it to full-screen, and go. Download and Install Virtual DesktopFirst, download and install the Virtual Desktop from Steam. The cost is $14.99, but well worth it. If your target price is, well, free, then you can download the free GoPro VR player from Kolor. However, you need to start and stop the videos on your desktop monitor and is not entirely VR integrated.Setup Virtual DesktopThe first thing to do is determine how BIG you want your desktop. The app lets you fully customize the size of the desktop. You can even specify with a simple slider control all the way up to 360 degrees which wrap the entire desktop around you. Although neat, 360 degrees is not too practical. Personally, I like 180 degrees with a screen distance around 3 meters.Playing 360/SBS VideosNow you have the virtual desktop installed and setup, playing 360 videos is easy! Just click the 360 Videos option (top right), then browse to your video. Depending on the video format, you will need to change the Video mode. If you see the image duplicated on the left and the right, then select Side By Side (SBS). If you're unsure which format you need, then just click the option until the video looks good. Very few videos these days are 180 degrees, most are 360 degrees in the video projection option.Steps to convert unsupported 3D videos to play on HTC ViveStep 1. Load your 3D movies Launch the video converter for HTC Vive, and click "Add file" button to import your source 3D materials. Or insert the Blu-ray disc to the Blu-ray Disc drive and click the "Add Blu-ray" button to have movies uploaded to the Blu-ray Ripper. 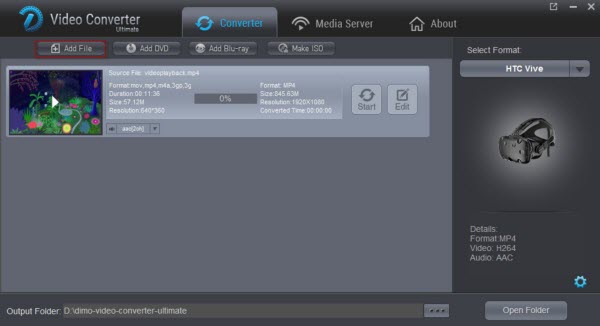 Step 2. Select output format Click "Format" and select "MP4" from "Format > Video" category as the output format. It works on HTC Vive perfectly. Tip: Click Settings to adjust the parameters like video codec, video bitrate, video frame rate, audio sample rate, audio channel. 1920x1080 compressed side-by-side 3D should be resampled to 1920x540 resolution full side-by-side resolution. And keep audio in AAC or MP3. Step 3. Select 3D mode Once you have gained proper information about video types then it is time to set a mode as per your video type so that it can work perfectly on your VR headset. The selection can be done as below:To get a SBS (Side-by-side) video, click "Edit", turn to "3D" and choose "Left/Right" mode. Finally hit OK button.
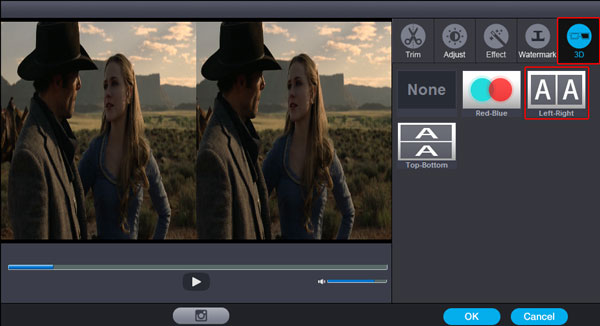 Step 4. Start conversion Click the "Start" button to start and finish the 3D video to HTC Vive conversion. After the conversion, click "Open" button to quickly locate the generated media file. Now you can transfer the converted 3D videos to play with HTC Vive using the above methods easily. Free Download or Purchase Dimo Video Converter Ultimate:
 Need the lifetime version to work on 2-4 PCs so that your friends and family can instantly broaden their entertainment options? Please refer to the family license here.
  Kindly Note:The price of Dimo Video Converter Ultimate for Windows is divided into 1 Year Subscription, Lifetime/Family/Business License: $43.95/Year; $45.95/lifetime license; $95.95/family license(2-4 PCs); $189.95/business pack(5-8 PCs). Get your needed one at purchase page.Contact us or leave a message at Facebook if you have any issues.Related Articles:
Source: How to Make 3D Videos for HTC Vive Watching
Kindly Note:The price of Dimo Video Converter Ultimate for Windows is divided into 1 Year Subscription, Lifetime/Family/Business License: $43.95/Year; $45.95/lifetime license; $95.95/family license(2-4 PCs); $189.95/business pack(5-8 PCs). Get your needed one at purchase page.Contact us or leave a message at Facebook if you have any issues.Related Articles:
Source: How to Make 3D Videos for HTC Vive Watching
As a quite hot file extension, MP4 is widely used for saving media data and can be found in lots of places online or off line, which means, you can get MP4 videos from YouTube, GoPro camera, Sony XDCAM EX camcorder or shared MP4 videos from others. However, you may run into a situation where you can't edit MP4 files in Adobe Premiere Pro CC, CS6, CS5, CS4, etc.. So what's the matter? Read on to find the reason and the easy way to fix the MP4 and Premiere Pro incompatible issues. MP4 files, which may be from different sources, such as from some video editing software, or from different Nikon/Canon cameras, have different codec inside. If your MP4 files are not accepted by Premiere Pro, it's probably because of the video or audio codec incompatibility. Fortunately, there is an easy solution to resolve the MP4 and PPro importing problems. Keep on to learn more details.In order to import MP4 files to Premiere Pro (Premiere CC 2017 included), the easy workaround is to transcode MP4to Adobe Premiere editing-friendly formats like MOV. This will allow for the software to work smoothly. The process to convert the MP4 files to Premiere Pro is fairly easy as long as you have such a tool like Dimo Video Converter Ultimate for Mac. By running it, there's no need to set the codec yourself: the program has optimized presets for Adobe Premiere, Avid Media Composer, iMovie, FCP, etc.. You can convert any video file to Adobe Premiere compatible format with loss-less quality.Free Download Dimo Video Converter Ultimate for Mac/Win: Other Download:
How to convert and import MP4 files to Premiere ProStep 1. Install and run the MP4 to Premiere Converter Mac; click "Add File" icon to load your source videos. You can also use the drag-and-drop method to load the media files to the application UI.
MP4 files, which may be from different sources, such as from some video editing software, or from different Nikon/Canon cameras, have different codec inside. If your MP4 files are not accepted by Premiere Pro, it's probably because of the video or audio codec incompatibility. Fortunately, there is an easy solution to resolve the MP4 and PPro importing problems. Keep on to learn more details.In order to import MP4 files to Premiere Pro (Premiere CC 2017 included), the easy workaround is to transcode MP4to Adobe Premiere editing-friendly formats like MOV. This will allow for the software to work smoothly. The process to convert the MP4 files to Premiere Pro is fairly easy as long as you have such a tool like Dimo Video Converter Ultimate for Mac. By running it, there's no need to set the codec yourself: the program has optimized presets for Adobe Premiere, Avid Media Composer, iMovie, FCP, etc.. You can convert any video file to Adobe Premiere compatible format with loss-less quality.Free Download Dimo Video Converter Ultimate for Mac/Win: Other Download:
How to convert and import MP4 files to Premiere ProStep 1. Install and run the MP4 to Premiere Converter Mac; click "Add File" icon to load your source videos. You can also use the drag-and-drop method to load the media files to the application UI. Step 2. Click on the "Select Format" bar and choose a best editable format. For editing MP4 in Adobe Premiere, choose "Editor > Adobe Premiere" as output format.Step 3. Set proper video/ audio parameters. Click the "Settings" button and set proper video/ audio parameters. You can reset set the video size, bitrate and fame rate.
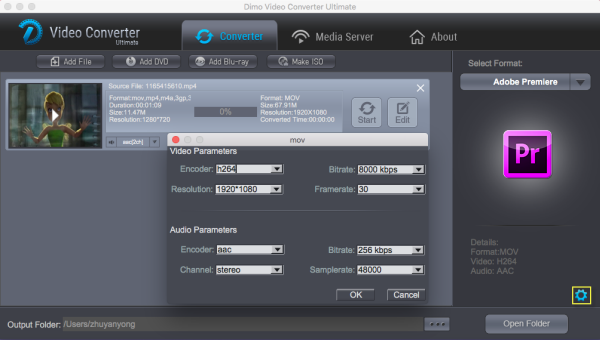 Step 4. Hit the "Start" button, it will start converting MP4 videos to Premiere Pro most compatible format immediately. Soon after the conversion, just click "Open" button to get the generated files for natively editing in Adobe Premiere Pro CC/CS6/CS5/CS4 perfectly.Free Download or Purchase Dimo Video Converter Ultimate for Mac/Win:
 Need the lifetime version to work on 2-4 Macs so that your friends and family can instantly broaden their entertainment options? Please refer to the family license here. Kindly Note:The price of Dimo Video Converter Ultimate for Mac is divided into 1 Year Subscription, Lifetime/Family/Business License: $43.95/Year; $45.95/lifetime license; $95.95/family license(2-4 Macs); $189.95/business pack(5-8 Macs). Get your needed one at purchase page.Related Software:BDmate (Mac/Win)Lossless backup Blu-ray to MKV with all audio and subtitle tracks; Rip Blu-ray to multi-track MP4; Convert Blu-ray to almost all popular video/audio formats and devices; Copy Blu-ray to ISO/M2TS; Share digitized Blu-ray wirelessly.DVDmate (Mac/Win)A professional DVD ripping and editing tool with strong ability to remove DVD protection, transcode DVD to any video and audio format, and edit DVD to create personal movie.Videomate (Mac/Win)An all-around video converter software program that enables you to convert various video and audio files to formats that are supported by most multimedia devices.8K Player (Mac/Win)A mixture of free HD/4K video player, music player, Blu-ray/DVD player, video recorder and gif maker. Contact us or leave a message at Facebook if you have any issues.Related Articles:
Source: Smoothly Import & Edit Canon T7i/800D MP4 files in Sony Vegas Pro
Need the lifetime version to work on 2-4 Macs so that your friends and family can instantly broaden their entertainment options? Please refer to the family license here. Kindly Note:The price of Dimo Video Converter Ultimate for Mac is divided into 1 Year Subscription, Lifetime/Family/Business License: $43.95/Year; $45.95/lifetime license; $95.95/family license(2-4 Macs); $189.95/business pack(5-8 Macs). Get your needed one at purchase page.Related Software:BDmate (Mac/Win)Lossless backup Blu-ray to MKV with all audio and subtitle tracks; Rip Blu-ray to multi-track MP4; Convert Blu-ray to almost all popular video/audio formats and devices; Copy Blu-ray to ISO/M2TS; Share digitized Blu-ray wirelessly.DVDmate (Mac/Win)A professional DVD ripping and editing tool with strong ability to remove DVD protection, transcode DVD to any video and audio format, and edit DVD to create personal movie.Videomate (Mac/Win)An all-around video converter software program that enables you to convert various video and audio files to formats that are supported by most multimedia devices.8K Player (Mac/Win)A mixture of free HD/4K video player, music player, Blu-ray/DVD player, video recorder and gif maker. Contact us or leave a message at Facebook if you have any issues.Related Articles:
Source: Smoothly Import & Edit Canon T7i/800D MP4 files in Sony Vegas Pro
There's always great audio content in whatever Blu-ray disc collections you have in your library. If you want to extract audio from Blu-ray from a Mac, you will need a Blu-ray to audio converter tool to rip just the audio of Blu-ray, and export the soundtrack to common MP3 audio format to your audio player so that you then listen to just the music. Here shows a step-by-step guide to convert Blu-ray to MP3 or extract MP3 audio from Blu-ray on Mac/PC.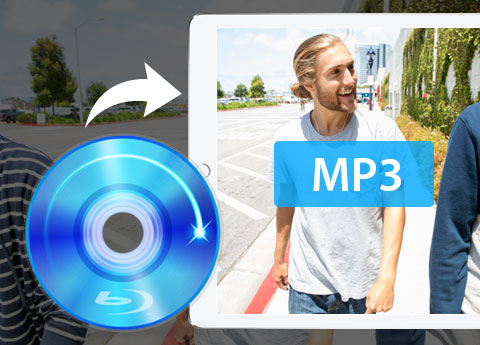 Since there are plenty of Blu-ray audio extractor packages out there claim that can decrypt Blu-ray disc and convert Blu-ray tracks to MP3 file for Mac/Windows, it can be a daunting task for users to choose a suitable MP3 converter. Today, we'll use an awesome program called Dimo Video Converter Ultimate for Mac that lets you do that in a one stop solution on Mac OS (Sierra 10.12 included).It has been around for years and remains one of the best Blu-ray ripping programs for taking the audio from your Blu-rays to .mp3 format on Mac and other kinds of common audio format like AAC, AC3, FLAC, etc. on iMac or MacBook. By extracting Blu-ray music from Blu-ray, you could easily play Blu-ray music on various MP3 compatible players like iPod, iPhone, Samsung, MP3 players, etc. For those who are using Windows system, please refer to its equivalent - Dimo Video Converter Ultimate. So first, choose what environment you want to work with the program to get Music Blu-ray tracks into .mp3 audio file. Here're the steps that I'm going to explain the process of ripping and converting movies of Blu-ray to .mp3.Hot Search: MP4 to MP3 | WMV to MP3 | MOV to MP3 | 4K to MP3 | M4A to MP3Free Download Dimo Video Converter Ultimate for Mac/Win: Other Download:
How to Convert Blu-Ray to MP3 or Extract MP3 Audio from Blu-RayStep 1: Install and launch the Mac Blu-ray Audio to MP3 Ripper; import your Blu-ray Disc or Backup saved on hard drive by clicking "Add Blu-ray" icon.
Since there are plenty of Blu-ray audio extractor packages out there claim that can decrypt Blu-ray disc and convert Blu-ray tracks to MP3 file for Mac/Windows, it can be a daunting task for users to choose a suitable MP3 converter. Today, we'll use an awesome program called Dimo Video Converter Ultimate for Mac that lets you do that in a one stop solution on Mac OS (Sierra 10.12 included).It has been around for years and remains one of the best Blu-ray ripping programs for taking the audio from your Blu-rays to .mp3 format on Mac and other kinds of common audio format like AAC, AC3, FLAC, etc. on iMac or MacBook. By extracting Blu-ray music from Blu-ray, you could easily play Blu-ray music on various MP3 compatible players like iPod, iPhone, Samsung, MP3 players, etc. For those who are using Windows system, please refer to its equivalent - Dimo Video Converter Ultimate. So first, choose what environment you want to work with the program to get Music Blu-ray tracks into .mp3 audio file. Here're the steps that I'm going to explain the process of ripping and converting movies of Blu-ray to .mp3.Hot Search: MP4 to MP3 | WMV to MP3 | MOV to MP3 | 4K to MP3 | M4A to MP3Free Download Dimo Video Converter Ultimate for Mac/Win: Other Download:
How to Convert Blu-Ray to MP3 or Extract MP3 Audio from Blu-RayStep 1: Install and launch the Mac Blu-ray Audio to MP3 Ripper; import your Blu-ray Disc or Backup saved on hard drive by clicking "Add Blu-ray" icon.  Step 2. Choose MP3 audio format. Here click the format bar to follow "Format > Audio" and choose MP3 as the output format. You can also choose output Audio Format as WMA (with 7.1 channels), AAC (with 5.1 channels), AC3 (with 5.1 channels), MKA (with 5.1 channels), MP3, WAV, M4A, OGG, WMA, AU, AIFF, MP2, FLAC, etc. Note: If you wanna some advanced settings, you can click "Settings" icon to adjust the video, audio parameters bitrate, frame rate from 24 fps up to 120 fps, sample rate, audio channel, etc. Plus, you can click "Edit" button to do some editing work like trimming any segment of Blu-ray for conversion.
 Step 4. Convert Blu-ray to MP3Click "Start" button to realize conversion from high fidelity Blu-ray to MP3. After completing Blu-ray to MP3 conversion, you can lick "Open" to locate the ripped MP3 and add them to any MP3 player or mobile devices for enjoying with Hi-res audio quality. Top Blu-ray Player recommendation 8K Player (Mac/Win)- A mixture of free HD/4K video player, music player, Blu-ray/DVD player, video recorder and gif maker.
- Support Blu-ray folder/ISO images along with the brand new HEVC/H.265 format playback without stuttering;
- Make vivid GIF at will during Blu-ray movies playing;
- No limitation to loop the video clips by a single clip or segment;
Bookmark in video whenever your inspiration coming out for future replaying;
Free Download or Purchase Dimo Video Converter Ultimate for Mac/Win: Need the lifetime version to work on 2-4 Macs so that your friends and family can instantly broaden their entertainment options? Please refer to the family license here. Kindly Note:The price of Dimo Video Converter Ultimate for Mac is divided into 1 Year Subscription, Lifetime/Family/Business License: $43.95/Year; $45.95/lifetime license; $95.95/family license(2-4 Macs); $189.95/business pack(5-8 Macs). Get your needed one at purchase page.Related Software:BDmate (Mac/Win)Lossless backup Blu-ray to MKV with all audio and subtitle tracks; Rip Blu-ray to multi-track MP4; Convert Blu-ray to almost all popular video/audio formats and devices; Copy Blu-ray to ISO/M2TS; Share digitized Blu-ray wirelessly.DVDmate (Mac/Win)A professional DVD ripping and editing tool with strong ability to remove DVD protection, transcode DVD to any video and audio format, and edit DVD to create personal movie.Videomate (Mac/Win)An all-around video converter software program that enables you to convert various video and audio files to formats that are supported by most multimedia devices.Contact us or leave a message at Facebook if you have any issues.Related Articles:
Source: Samsung TV Won't Play AVI Solution: Convert AVI to Samsung TV
MP4, as a popular video format for saving media data, can be downloaded from websites like YouTube, Fox and so on, or may be recorded by mobile devices such as Samsung phones. So when you have a bunch of MP4 videos and want to convert these MP4 to AVI for a change for enjoying on AVI accepted mobile phones, TV, home theater, PSP, Xbox, etc. or uploading to YouTube, you may get some useful tips here. There is an increase for the requirement of converting an MP4 into some other file formats, such as the AVI, which enables video and music lovers from taking full enjoyment of their videos and audios. And this similar purpose may be accomplished with the assistance of an MP4 to AVI converter.Here, you are suggested to download a professional Mac converter like Dimo Video Converter Ultimate for Mac to do the job. A good converting tool is a promoter to provide a fast, efficient MP4 to AVI Mac conversion that keeps your videos quality. In this conversion task, this program used here even offers some useful edit functions to make videos more eye-catching.Get the Best MP4 to AVI Video Converter:* Convert MP4 to AVI with three simple clicks.* Convert video between 150+ video formats with 90x faster converting speed.* Extract audio from your MP4, AVI or any video files. It converts video/audio to MP3, WAV, AC3, AAC, AIFF, WMA and more audio formats.* Crop, trim, rotate, add subtitles, watermarks or other effects to your video with built-in video editor.* Make ISO from MP4 videos for backup and playback whenever you want.* Download MP4 videos from YouTube or other popular sites like Vimeo, Vevo, Facebook, Hulu, Dailymotion and so on.* Perfectly compatible with Mac OS X 10.6 or later.If you need to convert MP4 to AVI on Windows PC (Windows 10 included), please turn to Dimo Video Converter Ultimate to solve all the problems. Here's our quick guide on how to convert MP4 files to AVI, so you can make compatibility issues a thing of the past.Free Download Dimo Video Converter Ultimate for Mac/Win: Other Download:
How to transcode MP4 to AVI on Mac/PCStep 1: Import MP4 Video filesClick "Add File" icon on main menu to browse your computer hard drive and load MP4 videos. This Mac MP4 to AVI converter also supports drag & drop MP4 files to the program. Once it's finished, you'll be presented with a screen that displays added videos, as shown below.
There is an increase for the requirement of converting an MP4 into some other file formats, such as the AVI, which enables video and music lovers from taking full enjoyment of their videos and audios. And this similar purpose may be accomplished with the assistance of an MP4 to AVI converter.Here, you are suggested to download a professional Mac converter like Dimo Video Converter Ultimate for Mac to do the job. A good converting tool is a promoter to provide a fast, efficient MP4 to AVI Mac conversion that keeps your videos quality. In this conversion task, this program used here even offers some useful edit functions to make videos more eye-catching.Get the Best MP4 to AVI Video Converter:* Convert MP4 to AVI with three simple clicks.* Convert video between 150+ video formats with 90x faster converting speed.* Extract audio from your MP4, AVI or any video files. It converts video/audio to MP3, WAV, AC3, AAC, AIFF, WMA and more audio formats.* Crop, trim, rotate, add subtitles, watermarks or other effects to your video with built-in video editor.* Make ISO from MP4 videos for backup and playback whenever you want.* Download MP4 videos from YouTube or other popular sites like Vimeo, Vevo, Facebook, Hulu, Dailymotion and so on.* Perfectly compatible with Mac OS X 10.6 or later.If you need to convert MP4 to AVI on Windows PC (Windows 10 included), please turn to Dimo Video Converter Ultimate to solve all the problems. Here's our quick guide on how to convert MP4 files to AVI, so you can make compatibility issues a thing of the past.Free Download Dimo Video Converter Ultimate for Mac/Win: Other Download:
How to transcode MP4 to AVI on Mac/PCStep 1: Import MP4 Video filesClick "Add File" icon on main menu to browse your computer hard drive and load MP4 videos. This Mac MP4 to AVI converter also supports drag & drop MP4 files to the program. Once it's finished, you'll be presented with a screen that displays added videos, as shown below. Step 2: Configure the output video settingsWhen you've selected the video(s), you can choose the export option you want. Click "Select Format" drop-down list, and then choose AVI from "Format > Video" as output file in the new-opened panel.Note: If your MP4 files are high definiation, please select a HD AVI as output under "Format > HD Video" list.Then go to the "Settings" option, from the Profile Settings you can tweak the settings as per your choice for the output file. However, you actually need not do anything as the MP4 to AVI converter program has every settings optimized by default.
 Alternatively, the program has a lot of out-of-the-box presets you can choose to convert MP4 into the exact format that will play on your portable player like PS3, PS4, PS4 Pro, iPhone, iPad, Xbox One S, Xbox One, Xbox 360, TV, Sony Vegas, Movie Maker, Premiere Pro, etc. All you need to do now is press the specific device button and wait for it to finish.Tips:Next, back to the main interface, and click the "...". Navigate to where you want to save your converted movie file, and type in a file name in the box. Click OK.Before you convert your MP4 videos you can also do some basic editing by clicking "Edit" option on the top of the window – this includes cutting out black parts of videos, rotating, flipping and add effect/watermark to the video.Step 3: Start converting MP4 to AVI on Mac/PCHit the "Start" button on the main window, and wait for the program to finish encoding .MP4 to .AVI file on Mac (OS Sierra) and Windows (10). After the conversion complete, now you're ready to enjoy your movie.Free Download or Purchase Dimo Video Converter Ultimate for Mac/Win: Need the lifetime version to work on 2-4 Macs so that your friends and family can instantly broaden their entertainment options? Please refer to the family license here. Kindly Note:The price of Dimo Video Converter Ultimate for Mac is divided into 1 Year Subscription, Lifetime/Family/Business License: $43.95/Year; $45.95/lifetime license; $95.95/family license(2-4 Macs); $189.95/business pack(5-8 Macs). Get your needed one at purchase page.Related Software:BDmate (Mac/Win)Lossless backup Blu-ray to MKV with all audio and subtitle tracks; Rip Blu-ray to multi-track MP4; Convert Blu-ray to almost all popular video/audio formats and devices; Copy Blu-ray to ISO/M2TS; Share digitized Blu-ray wirelessly.DVDmate (Mac/Win)A professional DVD ripping and editing tool with strong ability to remove DVD protection, transcode DVD to any video and audio format, and edit DVD to create personal movie.Videomate (Mac/Win)An all-around video converter software program that enables you to convert various video and audio files to formats that are supported by most multimedia devices.8K Player (Mac/Win)A mixture of free HD/4K video player, music player, Blu-ray/DVD player, video recorder and gif maker. Contact us or leave a message at Facebook if you have any issues.Related Articles:
Source: MP4 to AVI: Convert MP4 to AVI on Mac/Windows
Alternatively, the program has a lot of out-of-the-box presets you can choose to convert MP4 into the exact format that will play on your portable player like PS3, PS4, PS4 Pro, iPhone, iPad, Xbox One S, Xbox One, Xbox 360, TV, Sony Vegas, Movie Maker, Premiere Pro, etc. All you need to do now is press the specific device button and wait for it to finish.Tips:Next, back to the main interface, and click the "...". Navigate to where you want to save your converted movie file, and type in a file name in the box. Click OK.Before you convert your MP4 videos you can also do some basic editing by clicking "Edit" option on the top of the window – this includes cutting out black parts of videos, rotating, flipping and add effect/watermark to the video.Step 3: Start converting MP4 to AVI on Mac/PCHit the "Start" button on the main window, and wait for the program to finish encoding .MP4 to .AVI file on Mac (OS Sierra) and Windows (10). After the conversion complete, now you're ready to enjoy your movie.Free Download or Purchase Dimo Video Converter Ultimate for Mac/Win: Need the lifetime version to work on 2-4 Macs so that your friends and family can instantly broaden their entertainment options? Please refer to the family license here. Kindly Note:The price of Dimo Video Converter Ultimate for Mac is divided into 1 Year Subscription, Lifetime/Family/Business License: $43.95/Year; $45.95/lifetime license; $95.95/family license(2-4 Macs); $189.95/business pack(5-8 Macs). Get your needed one at purchase page.Related Software:BDmate (Mac/Win)Lossless backup Blu-ray to MKV with all audio and subtitle tracks; Rip Blu-ray to multi-track MP4; Convert Blu-ray to almost all popular video/audio formats and devices; Copy Blu-ray to ISO/M2TS; Share digitized Blu-ray wirelessly.DVDmate (Mac/Win)A professional DVD ripping and editing tool with strong ability to remove DVD protection, transcode DVD to any video and audio format, and edit DVD to create personal movie.Videomate (Mac/Win)An all-around video converter software program that enables you to convert various video and audio files to formats that are supported by most multimedia devices.8K Player (Mac/Win)A mixture of free HD/4K video player, music player, Blu-ray/DVD player, video recorder and gif maker. Contact us or leave a message at Facebook if you have any issues.Related Articles:
Source: MP4 to AVI: Convert MP4 to AVI on Mac/Windows